2002-04 NISSAN ALTIMA |
||||||||||||||||||
|
1. Remove the shift knob. The OEM knob will twist off (cc) but mine was very stubborn so I cut it off at the threads. Use a hacksaw and place a towel around the shifter to catch the metal clippings as you cut. Do NOT use dremel because it will throw clippings all over the interior of your car.
If you don’t plan on saving your OEM shift knob you can carefully cut it off and expose the elongated bolt that is easy to remove with a wrench. If you don’t want to cut down the shifter this is the way to go. However, I highly recommend you cut it down by at least one inch.
If you have already replaced your shift knob, remove it.
2. The shifter base is attached to the center console with four spring clips. Carefully pull up on the base until the clips release. Pull the base and boot over the shifter to expose where the OEM boot is attached to the shifter. Remove the boot from the shifter by moving the rubber O-ring down the shifter.
There is a large rubber grommet on the shifter where the O-ring is used to securely attach the boot to the shifter. Do not destroy this because you will need it for the new boot.
The boot is attached to the base with a black plastic square ring that is plastic-welded to the shift base. Do not destroy the black plastic square ring frame. There are a few ways to remove the square ring. Take note of the orientation of the black frame in reference to the base.
You can either take a soldering iron and carefully soften the welds until the base breaks away as you pull that the frame. Be very careful with this method, as it is very possible to distort the facing if you allow the base to get too hot.
Or, you can break the welds carefully with a small screwdriver. This is the method I used. Pop off the trim piece the surrounds the shift knob. Its held in by clips so pull up on it from the back and it should pop out. |
|
|
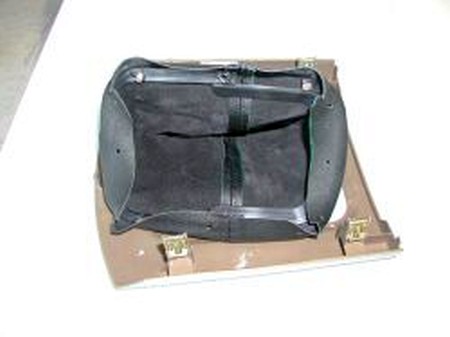
3. Once the black frame is removed, separate the boot from the black frame. Position the new boot around the black frame and install. See picture on the right - it was taken with the boot loose over the frame. There are many ways to install the new boot/frame combo. Below is the way I did mine. You may have a better method but my method does not require adhesive and I can easily replace the boot, should something happen to it. If you don't care about being able to remove the boot afterwards, gluing it to the plastic frame will be an easier way to go! |
 |
|
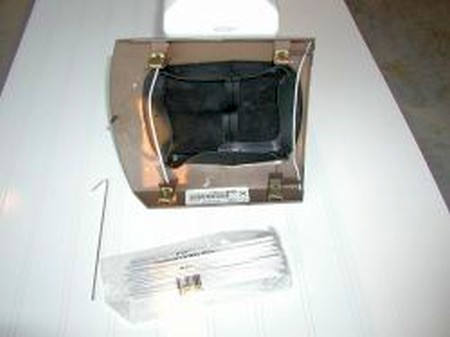
4. Take the base and drill four holes as the picture shows. Start with a small hole and work your way up if the hole is too small. You will need to get some 6.5-inch metal tie wire from Home Depot. Your holes should be large enough to just get the tie wire in the hole. Position the wire in the holes like the picture and bend tie wire to hold the frame/boot firmly against the shift base. |
 |
|
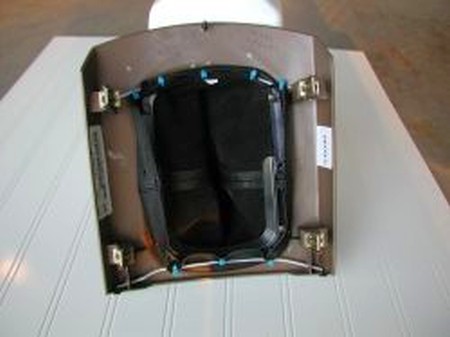
5. Next take some small plastic tie wraps and attach the boot to the metal ties to keep the boot from slipping off. Look at the picture to the right to see how it's been done by me.
At this point you can put this assembly aside and the directions will now focus on the replacing the emergency brake boot. If you are not replacing the brake boot, reverse the order of disassembly and reinstall. The boot may require an extra tie wrap at the point where the boot attaches to the large rubber grommet. This will keep it firmly attached to the shifter.
|
 |
|
6. The cup holder must be removed. There is a rubber insert inside the cup holder. On the rear cup holder there is a rubber grommet that conceals a screw. Remove the rubber grommet and take the screw out. It is a Phillips screw. The cup holder assembly can now be removed. It too is held in place with spring clips. Carefully remove the cup holder assembly by pull up. The actual cup holder is held in place with four screws. The screws are located on the underside of the cup holder assembly. Remove the four screws.
You will notice that the black plastic OEM e-brake cover is a flexible rubberized cover. It is plastic welded to the cup holder frame assembly. Remove the flexible rubberized cover by pulling the cover at each weld over the weld. The welds will resemble a mushroom. Be sure to keep the "mushrooms" intact at each corner of the rubberized cover. These mushrooms at each corner will be used to secure the new leather boot. |
|
|
7. The e-brake boot will be mounted on the four corners of the cup holder frame. You will have to punch holes for the boot to mount to the frame. I used a single hole punch but you can use a leather punch. Be sure not to make the holes too big (larger than a hole punch).
|
 |
|
8. Place the boot inside the frame as it is to be mounted. Make sure you have the boot positioned front to front and back to back. Test before punching your holes. The boot will be stretched between all four holes. There are additional mushrooms, but I only used the mushrooms at the corners. You may want to apply 3M adhesive to the boot between the corners to keep the boot in place but I did not do this because I did not feel it was necessary. |
 |
|
9. Once the boot is installed you will be ready to install the cup holder to the cup holder frame and reassemble the center console. That is it, you are done! Enjoy the new look of your car! |
|
|
Useful tip You have installed a product made out of genuine leather. As you know, to maintain a leather product in good condition, you should take care of it. We suggest occasionally (every 4-6 week for example) applying some leather conditioner/UV protector to keep your leather from drying up in the sun and cracking. |
|
Please subscribe to our newsletter.
Get an instant 20% discount and enter our montly $100 CASH sweepstakes!